

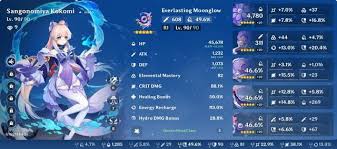
Sangonomiya Kokomi is a top-tier Hydro healer and applicator in Genshin Impact, excelling as a reliable off-field healer, Bloom driver, and Freeze enabler. In the current meta of Version 6.4 “Luna V” and beyond, Kokomi remains essential for Nilou Bloom teams, Hyperbloom variants, and consistent Hydro application without energy issues. Her HP-scaling kit provides massive healing, steady Hydro application via her jellyfish and burst, and solid personal damage in reaction teams.
This Kokomi build guide covers her profile, gameplay, talent priority, best weapons, artifacts & stats, top team comps, and constellations for optimal performance in 2026.
Kokomi Character Profile
- Element: Hydro
- Weapon: Catalyst
- Rarity: 5-Star
- Region: Inazuma (Watatsumi Island)
- Role: Healer / Hydro Applicator / Bloom Driver / Support / On-Field Driver (niche)
- Release: Version 2.1 (still meta-relevant in 2026)
Kokomi shines with constant off-field Hydro application through her Bake-Kurage (jellyfish) and Nereid’s Ascension burst, which creates a field for continuous attacks and healing. Her healing scales with Max HP, and she provides team utility in reaction-heavy comps like Bloom and Freeze.
Kokomi Gameplay
Kokomi’s playstyle focuses on quick swaps and sustained application:
- Normal Attack: Catalyst attacks (usable on-field during burst for Bloom/Freeze).
- Elemental Skill (Bake-Kurage): Summons a jellyfish that deals periodic Hydro DMG and heals the active character.
- Elemental Burst (Nereid’s Ascension): Enters Ceremonial Garment state—boosts Normal Attack SPD, converts attacks to Hydro, deals AoE Hydro DMG, and heals massively.
- Passive 1: Healing bonus increases with HP; crit rate is fixed low (prevents crit healing).
- Passive 2: Jellyfish heals more when HP is low.
Typical rotation: Skill (jellyfish) → Burst (on-field attacks if driver) → Swap to DPS for reactions. She’s low-maintenance with excellent uptime and no ER worries in most builds.
Kokomi Talent Priority
For her primary Healer/Bloom Driver role:
- Elemental Burst (max first) — Core for healing, Hydro application, and on-field damage in driver builds.
- Elemental Skill (max second) — Reliable off-field healing and Hydro ticks.
- Normal Attack (low priority unless on-field driver) — Only invest for Bloom/Freeze driver variants.
Crown Burst for maximum healing and damage output.
Kokomi Best Weapons
Focus on HP%, Healing Bonus, or Elemental Mastery (EM) for Bloom. Top options:
- Best in Slot: Everlasting Moonglow (5★) — Signature; HP%, healing bonus, and NA DMG based on HP—perfect for all roles.
- Strong Alternatives:
- Prototype Amber (4★ craftable) — HP + team ER battery after burst (F2P king).
- Thrilling Tales of Dragon Slayers (3★) — Massive team ATK buff (healer/buffer).
- Sacrificial Fragments (4★) — EM + skill reset for more jellyfish uptime (Bloom).
- Fruit of Fulfillment (4★) — EM stacking for reactions.
- Hakushin Ring (4★) — ER + team Elemental DMG buff.
For Bloom: Prioritize EM weapons. For pure healing: HP/Healing focus.
Kokomi Best Artifacts & Stats
Kokomi has flexible sets depending on role:
Best Set for Healer/Support: 4pc Tenacity of the Millelith (team ATK buff + HP) or 4pc Ocean-Hued Clam (healing explosion DMG) or 4pc Song of Days Past (healing buff).
Best Set for Bloom Driver: 4pc Flower of Paradise Lost (Bloom DMG bonus + EM).
Main Stats (Healer/Bloom Focus):
- Sands: HP% (or ER% if needed)
- Goblet: HP% (or Hydro DMG Bonus for hybrid)
- Circlet: Healing Bonus (or HP%)
Substats Priority:
- HP%
- Energy Recharge (130–180% for burst uptime)
- Elemental Mastery (for Bloom/Hyperbloom)
- Flat HP
Goal: 40k+ HP for healing, 200+ EM for Bloom, solid ER.
Kokomi Best Team Compositions
Kokomi fits perfectly in Bloom, Freeze, and Hyperbloom teams:
- Nilou Bloom (Meta King) — Nilou (Buffer) + Nahida (Dendro) + Kokomi (Hydro Driver/Healer) + Baizhu/Yelan (Extra Hydro/Dendro)
(Bountiful Cores for massive Bloom DMG; Kokomi on-field or off-field). - Freeze Teams — Ayaka/Wriothesley (Main DPS) + Shenhe/Kazuha (Buffer) + Kokomi (Healer/Hydro) + Diona/Zhongli (Shield)
(Consistent Freeze + VV shred + healing). - Hyperbloom — Nahida (Dendro) + Kuki Shinobu/Raiden (Electro Trigger) + Kokomi (Hydro Applicator) + Flex (Yelan/Furina)
(Kokomi enables cores; high EM for big Hyperblooms). - Taser/Driver — Kokomi (Driver) + Fischl/Beidou (Electro) + Sucrose/Kazuha (Anemo) + Xingqiu/Yelan
(Electro-Charged with healing).
Kokomi is irreplaceable in Nilou teams and provides safe, consistent Hydro for endgame like Spiral Abyss.
Kokomi Constellations
Kokomi is strong at C0—no must-pull constellations. Highlights:
- C1 (At Water’s Edge): Boosts jellyfish healing when HP low—solid QoL.
- C2 (The Clouds Like Waves Rippling): Burst duration + healing bonus—nice upgrade.
- C4 (The Moon Overlooks the Waters): NA hits restore energy—helps ER.
- C6 (Sango Isshin): Massive on-field DPS spike with Hydro infusion and DMG bonus—fun for driver builds.
C2+ are great for dedicated Kokomi mains, but C0 suffices for meta teams.
Conclusion
Sangonomiya Kokomi is a timeless Hydro support in Genshin Impact 2026—her healing, application, and Bloom synergy keep her in S-tier for Nilou teams and beyond. Stack HP for healing, EM for reactions, and use Everlasting Moonglow or Prototype Amber. Pair her with Nilou/Nahida for devastating Blooms or Ayaka for reliable Freeze.
Whether you’re clearing Abyss floors or farming events, Kokomi makes teams safer and stronger. What’s your favorite Kokomi team? Share below and happy exploring, Travelers! 🌊🐟


